12 Origami Paper Craft Projects to Try with Simple Folds
An origami paper craft can begin with one sheet, a clear crease, and a little curiosity. These twelve projects move from flat, approachable shapes to useful objects and more involved folded figures. You can make a cat face in a few folds, practice opening pockets with a paper boat, then work toward a crane or a dimensional box. For projects that use paper in other ways, explore our easy paper crafts DIY ideas for more beginner-friendly things to make.
These are genuine fold-only projects, not cut-and-glue crafts. Each entry includes the paper you need, numbered instructions, a folding tip and an optional link to pictures of the same version. The external guides are visual aids, not missing steps. Keep the paper orientation consistent from the first fold to the last.
Before You Start: Paper, Folds and Expectations
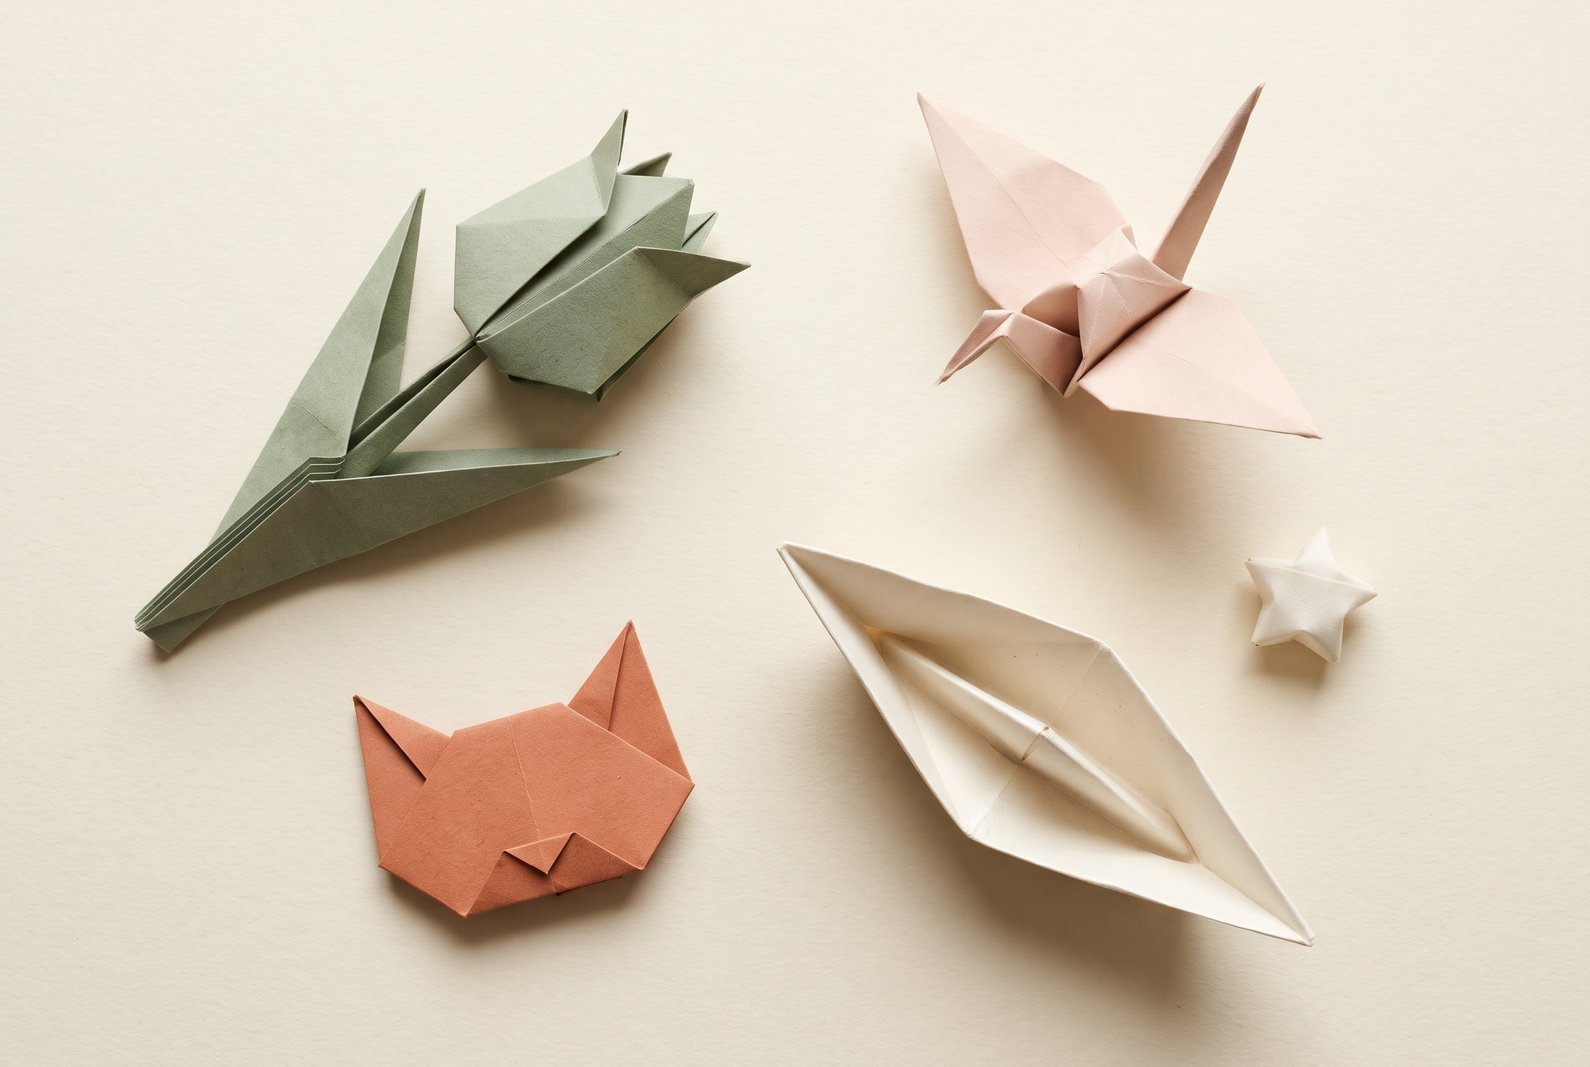
Most projects use one square of origami paper, preferably about 15 cm (6 inches) across while you are learning. The classic boat needs a rectangular sheet; the lucky star uses a long strip. Use a smooth table, match corners before creasing, and remember that thin paper is easier for layered models. The sailboat and tulip below are flat decorative versions, while the crane and masu box have more dimensional finishes.
A valley fold brings two parts of paper together like closing a book. A mountain fold sends the paper backward so the crease stands like a ridge. To precrease, fold and unfold to leave a guide line. A squash fold opens a flap and flattens it in a new direction; a reverse fold pushes a pointed section inside or outside along a prepared crease. On the crane, do not force a petal fold closed—open the layer first so the edges can move without tearing.
1. Folded Sailboat
This is the quick, flat sailboat version: one colored triangular sail above a contrasting hull, made from a square without cutting. It is especially good for practicing folds that tuck behind a picture model. Place it on a greeting card or use several to make a harbor scene; this design does not stand upright by itself.
You’ll need:
- square origami paper
- smooth folding surface
How to fold:
1. Use a square sheet that is colored on one side and plain on the other. Lay it flat, colored side facing you, with the edges horizontal and vertical.
2. Bring the top edge down to the bottom edge to mark a crease across the middle. Open the sheet again.
3. Fold the bottom edge up until it meets that middle crease. The plain reverse of the paper should form a narrow strip at the bottom: this is the hull.
4. To shape one triangular sail, turn the top-left corner behind the model along a diagonal crease running from the top-right corner to the left end of the middle crease. Keep the colored triangular area at the front.
5. Fold the two bottom corners of the pale hull strip backward at small angles, creating sloping ends rather than square corners.
6. If a pointed bit of paper sticks out beneath the hull from the diagonal fold, tuck it behind the model. Press the edges flat. You have a flat sailboat picture, suitable for a card or wall display—not a freestanding or floating boat.
Visual reference for this exact variation: Animated single-sail boat diagrams
Choose origami paper with one colored side and one white side: the contrast makes the triangular sail and narrow hull easy to see. For this version, keep the model flat on a card rather than trying to balance it upright or float it.

2. Simple Paper Cup
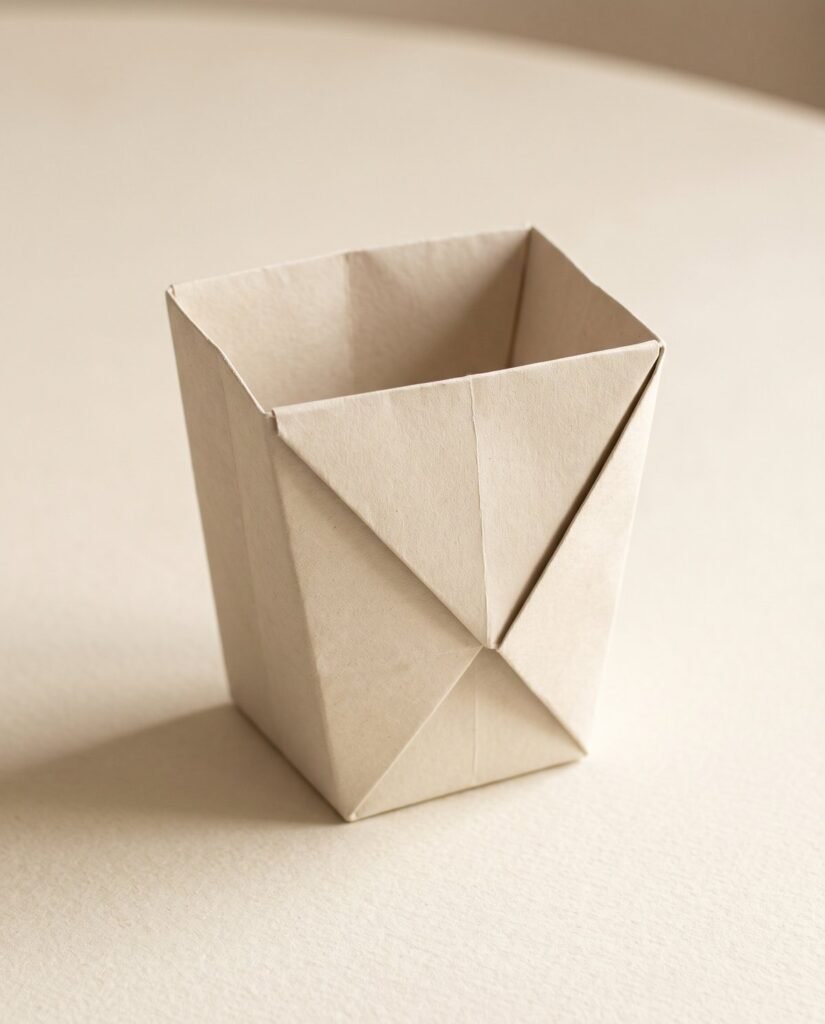
The classic paper cup is surprisingly practical: its two crossed side flaps form a pocket, and the top points fold into a neat rim. Make one as a miniature desk holder for lightweight paper scraps or beads. It is a good first exercise in overlapping layers without glue.
You’ll need:
- square origami paper
- clean flat surface
How to fold:
1. Set one square on the table as a diamond, with its uncolored side up. Fold the bottom point to the top point to make a triangle; leave the long folded edge at the bottom.
2. To judge where the first side flap should go, bring the upper sloping left edge of the top layer toward the bottom edge. Make a small pinch mark near the right side, then reopen this guide fold.
3. Take the left corner of the large triangle across the front until its tip meets your little pinch mark on the right sloping edge. Crease this flap firmly.
4. Fold the right corner across the first flap until its tip reaches the left side. The overlapping sides should now make a tapered pouch with two points at the top.
5. Separate the two loose top triangles. Fold the front top triangle down over the front rim, making a clean horizontal edge.
6. Fold the other top triangle behind the cup to match the rim on the back. Do not seal the two upper layers together.
7. Gently separate the opening with your fingers and press the bottom to create a narrow flat base. Keep this paper cup for dry, lightweight craft supplies—not hot drinks.
Visual reference for this exact variation: Traditional paper cup photo tutorial
Thin paper makes a neater rim. Use the cup for dry lightweight scraps or display—not hot drinks or food service.
This is a good place to learn how a pocket or flap holds its shape. Stop when the opening feels stable, rather than pulling apart layers that are meant to remain interlocked.
3. Pointed Cat Face
A cat face is one of the quickest animal folds because the ears come from the two outer corners of a triangle. The shape stays flat and is easy to personalize with a few pen marks, making it useful for handmade cards, gift tags or a row of different paper cats.
You’ll need:
- square origami paper
- pencil for optional decoration
How to fold:
1. Place a square as a diamond with the plain side facing up. Bring the top point down onto the bottom point, forming a triangle with the long folded edge along the top.
2. Lightly fold the triangle in half from left to right, then open it. The short vertical crease marks the middle of the face.
3. Take the left side corner and swing it upward on a slanting fold that begins near the bottom point. Let its tip rise above the top edge to make the first ear.
4. Repeat with the right corner at a similar angle. Check that the two ears are roughly the same height and that the middle of the face stays flat.
5. Fold the small bottom tip upward through the layers to make a blunt chin. Turn the whole model over so the neatly folded face is toward you.
6. Draw eyes, a nose, and whiskers if desired, or leave the face undecorated. The folds create only the head, not an entire paper cat.
Visual reference for this exact variation: Five-fold cat face diagrams
Keep the face free of drawn features for a minimalist version, or add a small expression afterward. Decorative marks are optional and are not part of the folded structure. If you want to give your folded cat a personality, our cute drawing ideas may inspire a few simple facial expressions.

4. Origami Fish
This easy fish starts with a long kite fold instead of complicated fin pockets. A small head tuck and an angled tail finish the flat profile. Try folding three fish in different sizes to make a simple paper aquarium display.
You’ll need:
- square origami paper
- folding surface
How to fold:
1. Lay a square like a diamond with the plain side upward. Fold the top point to the bottom point, press the horizontal crease, then open it again.
2. Bring the upper-right sloping edge inward to the horizontal crease. Repeat with the lower-right sloping edge. The two edges now touch in the middle, forming a long kite that points toward the right.
3. Tuck the left point a small distance toward the center. This short fold softens the fish’s head, while the long narrow point at the other end will become the tail.
4. Fold the entire kite in half along the horizontal center crease, moving the lower half behind the upper half. The model becomes a slim, layered profile.
5. At the narrow right end, fold the pointed tail upward diagonally through all the layers. Crease firmly so the tip stays lifted.
6. Turn the fish to the side with the cleanest outline and draw a small eye near the blunt head if you like. This is a simple flat fish with an upturned tail; it does not have separately folded fins.
Visual reference for this exact variation: Five-fold flat fish diagrams
Try using a 15 cm square before reducing the size. Since this design has no separately folded fins, keep the final photograph faithful to its simple tapered body and upturned tail.

5. Classic Paper Boat
The classic boat is a satisfying change from flat paper silhouettes: a folded hat becomes a square, then another triangle, before it opens into a little hull. Its crucial move is opening the folded layers from underneath without tearing the corners.
You’ll need:
- rectangular sheet of lightweight paper
- flat surface
How to fold:
1. Place an A4, Letter-size, or similar rectangular sheet upright (the short edge at the top). Fold the top edge all the way down to the bottom edge, then sharpen the fold.
2. Fold the short, wide rectangle from left to right, crease, and unfold that last fold. Keep the first fold at the top; the new crease shows the center.
3. Bring the upper-left corner diagonally down so its top edge lines up with the center crease. Do the same with the upper-right corner. A large triangle should form, with loose strips left underneath.
4. Lift the front loose bottom strip upward along the bottom of the triangle. Turn the model over and lift the remaining strip up on the back. Tuck any loose corner tips around the sides so the hat shape stays together.
5. Hold the hat from underneath and pull its front and back layers apart. Bring the two ends of the brim toward each other and flatten the opened shape into a diamond-shaped square.
6. Lift the bottom corner of the front layer up to meet the top corner. Turn over and do the same to the back layer, producing a smaller, thicker triangle.
7. Open this small triangle from below and flatten it sideways into a second, smaller diamond.
8. Grip the two free upper points of the diamond, one in each hand. Pull them gently apart until the layers open into a boat with raised ends. Widen and square the bottom so it can rest on a table.
Visual reference for this exact variation: Traditional paper boat folding diagrams
A rectangular page is important for this traditional method. The boat is a useful exercise in opening folded pockets without tearing the corners.
The boat is especially helpful if flat drawings of folds are difficult to interpret: each opening changes the shape in your hands, making the relationship between a triangle and a square easier to see.

6. Tulip Flower
This tulip is a flat, stylized bloom with two pointed petals that rise from a folded triangle. It is ideal for a spring card or a simple bouquet display. A separate green stem is optional; the flower head itself requires only a few folds.
You’ll need:
- square colored origami paper
- separate green paper if making a stem
How to fold:
1. Start with one colored square placed like a diamond, plain side up. Fold the upper corner down to the lower corner to form a triangle.
2. Rotate the folded triangle so its broad folded edge is at the bottom and its point faces upward. Keep the bottom center as the hinge for both petals.
3. Bring the right-hand corner up on a diagonal fold that begins at the bottom center. Let its point extend above the top of the triangle, angled a little outward.
4. Bring the left-hand corner up the same way to form a second raised petal. Vary the angle slightly if you want a more natural flower shape.
5. Turn the bloom over. If little side corners protrude, fold them behind to make the outline tidier, then turn it face-up again. This version is a flat tulip head, not an inflated flower.
6. If you also want a stem, fold one separately from a green square. Slide the pointed stem tip into the small opening at the bottom of the flower where possible, or use the flower head on its own for a flat craft.
Visual reference for this exact variation: Flat folded tulip diagrams
Use a different paper color for each bloom. The flower head is intentionally flat; if you make a separate folded stem, fit its tip inside the base opening rather than promising a one-piece flower.

7. Samurai Helmet
The traditional samurai helmet, or kabuto, uses separate paper layers to create two pointed horns and a folded brim. A small square makes a tabletop miniature. Larger newspaper squares can produce a wearable paper version, though it provides no protection.
You’ll need:
- square origami paper
- smooth surface
How to fold:
1. Lay a square as a diamond, plain side up. Bring the top corner down to the bottom corner to make a triangle with its long fold at the top.
2. Fold the left and right corners of the triangle down to the lowest point. Press the new slanting folds so the paper forms a smaller diamond with two front flaps.
3. Lift the tips of those two front flaps upward until they reach the upper point of the diamond. Keep the rear layer flat.
4. Fold each lifted tip outward on a diagonal, starting near the middle. They will point left and right like the helmet’s horns; match their angles before creasing.
5. Raise only the top layer of the remaining bottom point, stopping its tip just above the base of the horns. Crease.
6. Fold that same front layer upward once more to create a strong horizontal brim beneath the horns.
7. Fold the final bottom layer up behind the model, or tuck it carefully inside the back opening. Open the lower edge slightly to give the miniature helmet its shape.
Visual reference for this exact variation: Traditional samurai helmet diagrams
Creasing evenly is more important than working fast. Display the finished helmet as a miniature paper sculpture; it is not protective headwear.

8. Folded Butterfly
This decorative butterfly gains volume from a collapsed waterbomb base and a small central locking fold. The wings can be opened and shaped, but it is not a self-flapping toy. Choose patterned paper to highlight the layered wing shapes.
You’ll need:
- square thin origami paper
- flat surface
How to fold:
1. Begin with a square, plain side up. Fold it diagonally corner-to-corner in one direction, unfold, then repeat along the other diagonal.
2. Turn the square over. Fold it in half edge-to-edge vertically and horizontally, unfolding after each crease.
3. Bring the left and right sides inward along the existing creases as the top half settles down. Press the paper into a four-layer triangle with its main point at the top. This is a waterbomb base.
4. With the triangle flat, raise the two bottom corners of the front layer to the top point. Those folded triangles form a diamond on the front; leave the back layer alone.
5. Turn the model over. Fold its upper point downward toward the lower edge, allowing the two side wings to spread rather than trapping them under the fold.
6. Fold the little tip that now protrudes beyond the edge back upward over that edge. This small locking flap helps hold the butterfly’s middle together.
7. Turn the model back over and fold it gently in half along the vertical center so the wings approach one another. Then open it partway and pinch the center to give the wings dimension.
8. Adjust the four wing sections with your fingers. This is a decorative folded butterfly; the wings can flex when handled but it is not a mechanically flapping toy.
Visual reference for this exact variation: Waterbomb-base butterfly diagrams
Thin paper is easier to collapse at the base and lets the little locking flap stay flat. In photographs, show actual folded paper wings—not scalloped, feathery or transparent fantasy wings.

9. Jumping Frog
The jumping frog is the action model in this collection. Its folded back creates a spring; when you press and release it, the paper can hop across a tabletop. The diagonal collapse at the beginning matters as much as the final pleat.
You’ll need:
- square origami paper
- hard flat surface
How to fold:
1. Fold a square sheet in half to create a rectangle, keeping the colored side on the outside. Set it upright with the folded edge at the top.
2. Crease the upper-left corner diagonally down toward the right side and open it. Repeat with the upper-right corner toward the left so the diagonal lines cross in an X near the top.
3. Turn the paper over. Pinch the two sides of the X inward and press the top section down into a flattened triangle, leaving a straight rectangular section underneath.
4. Bring the bottom edge of the rectangular section upward until it meets the base of the triangular top. Crease this fold and keep the lower section positioned for the next side folds.
5. Lift one triangle flap aside temporarily. Bring the corresponding long straight edge of the rectangle into the middle, then return the flap. Repeat on the other side so both long edges meet beneath the triangular top.
6. Fold the remaining lower edge up toward the base of the triangle again. Make diagonal creases at its corners, then gently pull the lower side points outward so this section opens into a shallow boat-like flap.
7. Fold the two points of that lower flap inward/down toward its center to shape the hind legs.
8. Fold the upper triangular points diagonally outward to create the front legs. Check the four legs are reasonably balanced.
9. Fold the rear section of the frog up toward its body, then fold part of it back downward to form a firm zigzag pleat. This pleat is the spring that will make the frog hop.
10. Flip the finished frog over, set it on a hard table, press the folded rear edge briefly, and slide your finger off to release. If it only slides, sharpen the pleat and try again.
Visual reference for this exact variation: Natural History Museum square-paper frog photo tutorial
Use medium-weight paper so the spring stays crisp. Actual jump distance varies; a frog that merely rocks forward can still show that the folds are working.
A jumping frog may require a few retries. Check that the rear pleats align and the paper has not become too soft from repeated pressing before starting again.

10. Traditional Crane
The traditional crane is the most demanding model here because it uses two petal folds followed by inside reverse folds for the neck, tail and head. Begin with a larger thin square so the stacked layers remain manageable. The finished crane has broad wings and a defined body.
You’ll need:
- square thin origami paper
- patience for precise creases
How to fold:
1. Lay a thin square with its colored side facing you. Fold it corner-to-corner along both diagonals, unfolding between folds so an X remains.
2. Flip the paper over and fold it edge-to-edge in half vertically and horizontally, opening it after each crease.
3. Use those four creases to collapse the square: guide the left and right sides inward as the upper half comes down. Flatten it into a smaller four-layer square with the loose corners pointing down. This is the preliminary (square) base.
4. Working only with the top layer, fold its two lower sloping edges inward until they align with the vertical center. Fold the small triangular top tip down, then unfold that top tip and both side flaps to leave guide creases.
5. Lift the bottom corner of the top layer upward. As it opens like a long pocket, push its side edges inward along the guide creases so they lie flat against the center. Flatten the tall diamond: that movement is a petal fold.
6. Turn the paper over. Repeat the side-edge creases, top-tip crease, reopening, and upward petal fold on the other side. The narrow, layered result is the bird base.
7. Turn the bird base so its two separate narrow points face downward. Fold both lower sloping edges of the front layer inward to the center line, narrowing the lower half.
8. Turn the model over and narrow the lower sloping edges on the back in the same way, matching the first side.
9. Lift one skinny bottom point upward between the two broad wings. To keep it there, open the flap slightly and push its lower fold inside itself along the new angle, then flatten. This is an inside reverse fold.
10. Inside-reverse-fold the other skinny bottom point upward as well. One raised point will form the neck and the other the tail.
11. On the chosen neck, bend the very tip down and then tuck that bend inside the neck layers to form a small downward head.
12. Fold each large outer flap down and outward from the body to form a wing. Hold the neck and tail gently apart to broaden the body, then lift the wings into their final spread shape.
Visual reference for this exact variation: Nineteen-step paper crane diagrams
Treat the crane as the challenge project. If a petal fold refuses to open, check the precreases before pulling; with a properly made bird base, the neck and tail will fold upward without cutting or gluing.
If the bird base will not open evenly, return to the preliminary base instead of pushing the layers. The crane rewards accuracy, and the final model should have visible paper edges rather than a seamless molded look.

11. Masu Gift Box
A masu box turns one square into a tiny open tray with upright walls and tucked-in ends. Its folds do not need glue, making it an appealing way to present lightweight stationery or small dry keepsakes. The main challenge is lifting the corners without losing the square floor.
You’ll need:
- square sturdy origami paper
- bone folder optional
How to fold:
1. Place a square sheet with the plain side up. Fold it in half horizontally and vertically, reopening after each fold to locate the center.
2. Fold each of the four corners inward to that center point, making a smaller layered square. Press the folds without overlapping the tips.
3. Rotate the paper so its sides are horizontal and vertical. Fold the upper and lower edges to the middle, crease, then reopen those two edges.
4. Unfold the top and bottom triangular corner flaps completely, but leave the left and right corner flaps folded inward.
5. Fold the left and right straight edges inward to the center and reopen them. You now have several parallel crease lines marking the box walls.
6. Raise the two long side walls along their existing creases, keeping the center panel flat as the floor.
7. At the top open end, push the two angled corner areas inward toward each other. As they meet, the end flap lifts upright between the long walls.
8. Fold the pointed end flap over the upper edge and down inside the box. Press it into the floor so it traps the two corner folds.
9. Repeat the same corner-collapse and inward tuck at the opposite end. Straighten all four walls and push the square bottom flat.
10. For a lid, fold a second box from a slightly larger sheet, or make the outer box slightly wider by leaving small gaps at the center folds. Check the fit before gifting.
Visual reference for this exact variation: Traditional masu box photographs
The finished box is best for small, dry, lightweight items. A lid must be folded separately, with a slightly larger outer fit; do not assume two identical boxes will nest neatly.
Think of this as a small organizer rather than a storage box for anything heavy or damp. A sharper square base helps the sides stand without extra adhesive.

12. Lucky Paper Star
A lucky paper star starts as a loose knot in a narrow strip instead of a square. Repeated wraps create a flat pentagon; careful pressure then puffs it into a tiny five-point star. Make a handful for a decorative jar or gift wrapping.
You’ll need:
- long narrow paper strip
- scissors only if preparing strips
How to fold:
1. Use a narrow paper strip, ideally about 1 cm wide and 25–30 cm long for practice. Leave a short tail near one end and loop the strip into a loose overhand knot.
2. Feed the short tail through that loop gently. Tighten it just enough to make a neat, flat five-sided pentagon; pulling too hard will crumple the paper.
3. Hide the short tail under an existing layer on the back of the pentagon. If it is longer than the model, trim only the excess before tucking it away.
4. Wrap the remaining long strip around the pentagon, lining each wrap up with the next edge. Let the pentagon’s angles tell you which way to fold.
5. Continue alternating edges as the strip goes around and around the shape. Keep the paper flat and fairly snug, but do not squash the middle.
6. When the free end is too short for another full wrap, slide it beneath the nearest overlapping layer so it disappears.
7. Hold the finished flat pentagon by its points. Very gently press the middle of each of its five sides inward with a fingernail; do this a little at a time all around.
8. Adjust the puffed points until it looks like a small dimensional five-pointed star. If the paper caves in, use a fresh strip and wrap a little less tightly next time.
Visual reference for this exact variation: Traditional lucky star folding tutorial
Unlike the square-sheet projects, this one uses a paper strip. Precut strips let the actual folding stay glue-free; avoid claiming the stars are perfectly uniform.
How to Choose Your First Origami Paper Craft
Start with the cat face, sailboat or flat tulip if you want a quick result. The paper cup, samurai helmet and classic boat teach layers and pockets; the fish practices a clean kite fold. The butterfly and jumping frog introduce a collapse, while the crane and masu box ask for careful attention to several connected folds. This is a suggested progression, not a test of skill.
If a fold feels impossible, check the shape of your starting paper and the direction of the last turn. A common mistake is folding every layer when the instruction says to move only the front layer. Each project also includes an optional link to a matching photo or animated guide if you want to compare the geometry; you do not need to invent an unseen fold to finish the directions above.
Final Thoughts on Origami Paper Craft Projects
The best way to improve at origami paper craft is to repeat a finished model with slightly cleaner corners and more confident crease placement. Fold a second boat, make a cat face in a new color, or try a set of lucky stars with several strip widths. A flat tulip may be the right project for a first afternoon; the crane is worth saving until you can concentrate on the petal and reverse folds. Both count as satisfying paper work.
For seasonal paper projects beyond these everyday folds, explore our easy Christmas craft ideas for decorations that work well alongside folded ornaments and stars.